

The lease ends in a few weeks. Facilities has a removal schedule, IT has a spreadsheet that may be incomplete, and the loading dock is filling with laptops, monitors, servers, printers, phones, and unidentified cables. Treating that pile as ordinary office clutter is how organizations lose data, equipment value, and proof of responsible disposal.
This Office Cleanout and Electronics Recycling Guide treats the project as an IT, security, and finance workflow first, and a facilities task second. The objective is simple, separate data-bearing assets before pickup, route each item to the right disposition path, and retain documentation that shows who handled every serialized device.
Table of Contents
- What an Office Cleanout and Electronics Recycling Workflow Actually Looks Like
- Inventory and Asset Tagging Before Anything Leaves the Building
- Choosing the Right Secure Data Destruction Method
- Compliance, Certificates, and Chain of Custody
- Pickup Logistics, Hazardous Items, and Value Recovery
- Team Roles, Timelines, and Templates for Repeatable Cleanouts
- Checklist and Next Steps With Beyond Surplus
What an Office Cleanout and Electronics Recycling Workflow Actually Looks Like
A controlled cleanout connects six stages: inventory and asset tagging, data-bearing asset separation, secure destruction or redeployment, certification and chain of custody, pickup and logistics, and final reporting. Skipping the first two stages creates the greatest exposure. A recycler can't certify an asset accurately if nobody can identify what left the building or whether its storage media was still present.
The global waste picture makes this more than a housekeeping issue. The world generated 62 million tonnes of e-waste in 2022, equal to about 7.8 kilograms per person, and that total is projected to reach 82 million tonnes by 2030, a 33% increase from 2022, according to the Global E-waste Monitor 2024. Only 22.3% of 2022 e-waste was formally collected and recycled in an environmentally sound way, leaving more than US$62 billion in recoverable resources unaccounted for, as reported in the same assessment.
Practical rule: Nothing leaves the floor until it has an owner, a serial number, a data classification, and a planned disposition.
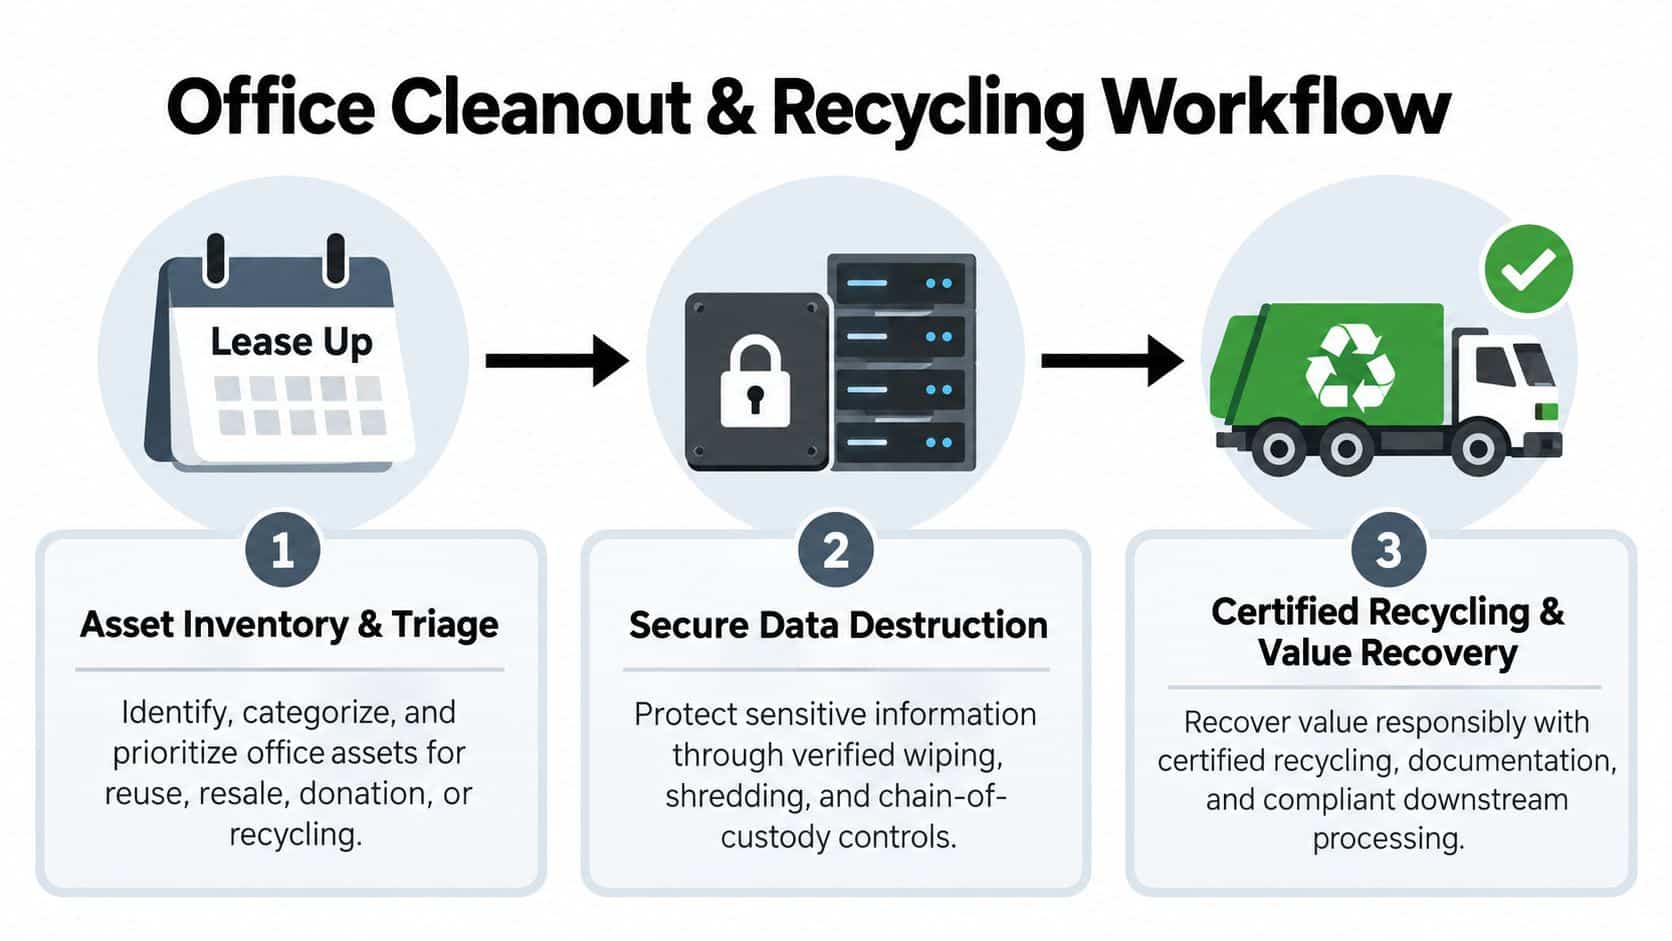
The six stages that keep the project controlled
- Inventory and tagging: Reconcile the CMDB, procurement records, lease schedules, and a physical floor walk.
- Data separation: Move laptops, desktops, servers, phones, drives, USB media, and data-capable printers into controlled staging.
- Disposition decisions: Mark equipment for redeployment, resale, recycling, or physical destruction.
- Documented handoff: Record each custody transfer and require certificates that match the serialized inventory.
- Pickup execution: Load sealed, separated shipments according to the approved routing plan.
- Final reporting: Reconcile exceptions, value recovery, destruction records, recycling records, and unresolved items.
Organizations also need to separate electronics from ordinary moving activity. A general office removals London guide can help with broader relocation planning, but IT assets require a distinct security and disposition process. For a commercial cleanout, use a dedicated office cleanout service when the project includes serialized technology, data destruction, or multiple downstream routes.
Inventory and Asset Tagging Before Anything Leaves the Building
The inventory should be complete before anyone boxes equipment. Start with a CMDB export, endpoint-management records, procurement files, lease documents, and finance's fixed-asset register. Then perform a room-by-room floor walk with an IT representative and a facilities representative. The floor walk is where undocumented monitors, spare laptops, retired servers, and devices stored in closets usually appear.
Assign each item three classifications. First, record data risk, such as active production, retired but containing credentials, wiped and ready, or non-data-bearing peripheral. Second, record ownership, including leased, company-owned, or customer-loaner equipment. Third, assign the planned route: redeploy, sell back, recycle, or destroy.
The people and fields that make the list defensible
IT should identify the device and validate its data status. Facilities should confirm location and access conditions. Finance or procurement should resolve ownership and lease obligations. A qualified ITAD partner can provide the import template, but your organization must approve the inventory before pickup.
The CSV should contain, at minimum:
- Asset identifier: Internal tag, manufacturer, model, serial number, and barcode.
- Physical details: Building, floor, room, staging area, and photographs where condition matters.
- Ownership status: Owned, leased, loaned, or subject to another party's return requirements.
- Data classification: Storage present, storage removed, wipe complete, or destruction required.
- Disposition route: Redeployment, resale, recycling, product destruction, or exception review.
- Approval record: Responsible reviewer, approval date, and notes about missing or damaged identifiers.
| Asset Tagging Fields Required Before Pickup | Purpose |
|---|---|
| Serial number and internal asset tag | Connects the physical item to the final certificate |
| Manufacturer and model | Identifies equipment type and processing requirements |
| Location and photo | Proves where the item was found and supports reconciliation |
| Ownership and lease status | Prevents improper disposal of third-party property |
| Data-risk classification | Determines wiping, purge, or destruction decisions |
| Intended disposition | Separates value recovery from recycling and destruction |
| Exception notes | Preserves an audit trail for missing or altered assets |
An asset that was never recorded isn't an excuse to bypass controls. Photograph it, assign a temporary identifier, record its location and custodian, and hold it in the exception queue until IT and finance approve its route. Keep the signed reconciliation sheet with the final receiving summary. A structured inventory optimization process can help organizations turn that physical sweep into a repeatable control rather than a last-minute count.
Choosing the Right Secure Data Destruction Method
One destruction method shouldn't be applied to every device. Match the treatment to the media, data risk, recovery requirement, ownership, and operational need. A bulk retired laptop may be suitable for controlled off-site processing, while a production drive containing regulated information may justify on-site destruction or a witnessed process.
NIST's media-sanitization decision process starts with confidentiality classification, then selects Clear, Purge, or Destroy. Clear is intended to stop simple, non-invasive recovery. Purge is designed to make recovery infeasible even with state-of-the-art laboratory techniques. Destroy renders the media unusable for future storage. NIST also recommends verification by sampling pseudorandom locations across addressable space, including user-addressable and reserved areas, as described in its media sanitization guidance.
Use the asset tag to select the method
On-site wiping or shredding gives the organization tighter control over custody and is appropriate for sensitive workloads, active production drives, and situations where the customer requires direct observation. Off-site destruction can work for bulk retired equipment when the vehicle, container, route, receiving process, and facility controls are documented.
Software wiping and physical destruction aren't interchangeable. Spinning disks may support approved overwrite or purge processes, while SSDs and flash media require handling that accounts for wear-leveling and hidden storage areas. Degaussing also has limited applicability and shouldn't be treated as a universal answer for modern solid-state media.
| Data Destruction Methods Compared | Best For | Risk Level |
|---|---|---|
| Clear | Low-risk media with a reuse requirement | Lower, when verified |
| Purge | Retired media requiring stronger recovery resistance | Controlled |
| Physical shredding | Media that must never be reused or recovered | Lowest residual-media risk |
| On-site service | Sensitive assets and witnessed destruction | Reduced custody exposure |
| Off-site service | Bulk equipment with sealed, logged transport | Acceptable with controls |
The decision rule is straightforward: the inventory classification selects the process. Don't let a vendor default every drive to wiping, and don't destroy equipment that could be securely redeployed or sold. Document the standard applied to each drive and record exceptions for media that can't be accessed, identified, or processed as planned. For solid-state media, compare the available approaches in this secure SSD destruction guide.
Compliance, Certificates, and Chain of Custody
Compliance is the deliverable, not paperwork added after the truck leaves. The FTC Disposal Rule applies to any person who maintains or possesses consumer information for a business purpose and requires reasonable measures against unauthorized access during disposal. For electronic media, the rule identifies destruction or erasure that makes information impracticable to read or reconstruct as an example of compliance, as explained in the FTC Disposal Rule overview.
The European WEEE framework shows how modern electronics management moved toward separate collection, verified treatment, and measurable recovery obligations. The EU adopted the WEEE Directive in 2003, and Directive 2012/19/EU later established collection targets of 65% of the average weight of equipment placed on the market or 85% of WEEE generated, as documented in the Global E-waste Monitor report. Multinational organizations should expect the same principles to shape internal controls even when the cleanout occurs elsewhere.
Record every handoff
Chain of custody begins at the locked staging area and continues through loading, transport, receiving, destruction, reuse, recycling, and final reporting. Each handoff should identify the serialized assets, date, location, releasing person, receiving person, and condition of the shipment.
Require these close-out documents:
- Certificate of Destruction: Serial numbers, destruction method, date, and applicable sanitization standard.
- Certificate of Recycling: Non-data-bearing materials and the downstream processing route.
- Itemized manifest: Units, weights where relevant, exceptions, and unresolved discrepancies.
- Bill of Lading or pickup record: The shipment, carrier, origin, destination, and scanned assets.
- Exception report: Devices that couldn't be wiped, reused, destroyed, or processed as expected.
| Required Compliance Documents per Asset Class | Governing Standard | Required Certificate | Acceptable Sanitization |
|---|---|---|---|
| Laptops and desktops | FTC Disposal Rule | Destruction or recycling certificate | NIST Clear, Purge, or Destroy as classified |
| Servers and storage media | Internal security policy and approved media standard | Serialized destruction certificate | Purge or physical destruction when required |
| Healthcare-related devices | Applicable organizational privacy controls | Device-level disposition record | Approved sanitization or destruction |
| Non-data peripherals | Environmental and recycling requirements | Certificate of Recycling | No media sanitization unless storage exists |
| Leased equipment | Contract and lessor instructions | Return or receiving record | Method approved by the owner |
A chain-of-custody form isn't unique to electronics. A template for art collectors illustrates the broader principle of documenting custody changes clearly. File the final certificates against the original inventory so an auditor can search one asset number and trace it from its desk location to disposition. Beyond Surplus's compliance documentation service is one example of a workflow built around that close-out requirement.
Pickup Logistics, Hazardous Items, and Value Recovery
The loading dock becomes the failure point when the team waits until pickup day to sort equipment. Stage the project in waves. Move data-bearing assets first under locked transport, then peripherals and non-data electronics, and finally furniture or other bulk office material. The recycler should arrive to collect pre-sorted routes, not to decide what each device is while the lease clock runs down.
Build the dock plan before the truck arrives
Use a locked staging zone with controlled access. Confirm elevator reservations, dock hours, parking, building insurance requirements, loading equipment, and the person authorized to sign the handoff. Require sealed vehicles, documented routes, and a signed Bill of Lading that reflects every serial scanned at pickup.
Handle special materials separately. Tape and bag loose lithium batteries, isolate CRT monitors for lead-glass handling, keep toner cartridges in their original boxes where possible, and route equipment containing refrigerants or mercury lamps through qualified hazardous-material channels. Don't place these items in a general electronics pallet.

Protect value before sending equipment to scrap
Separate likely resale assets before loading. Laptops under five years old, current-generation servers, and managed mobile devices may deserve a buyback review, subject to condition, ownership, warranty, and data status. Photograph working equipment, capture model and serial information, and obtain a written quote before defaulting to recycling.
Furniture removal can run on a separate work order. A resource covering furniture disposal from Woodstock Furniture may help facilities teams coordinate non-IT items without mixing those materials into the electronics chain of custody. For regional planning, review the requirements for bulk IT equipment disposal in Georgia when a project includes large equipment volumes, multiple pickup waves, or a broader building clearance.
Team Roles, Timelines, and Templates for Repeatable Cleanouts
A cleanout that happens once will be improvised. A cleanout that happens every quarter can be controlled. Organizations should create a small operating team with named decision rights, then reuse the same templates, staging rules, approval points, and vendor scorecard for every retirement cycle.
Assign ownership before the first floor walk
The Program Owner approves the asset inventory, project scope, exceptions, and final certificates. The IT Lead validates sanitization standards and approves drive exceptions. The Facilities Lead controls dock access, staging zones, elevators, and building coordination.
The Security Lead witnesses destruction where required and audits custody handoffs. The Finance Lead reconciles buyback credits against written-down asset value and confirms that proceeds or credits are applied to the project record.
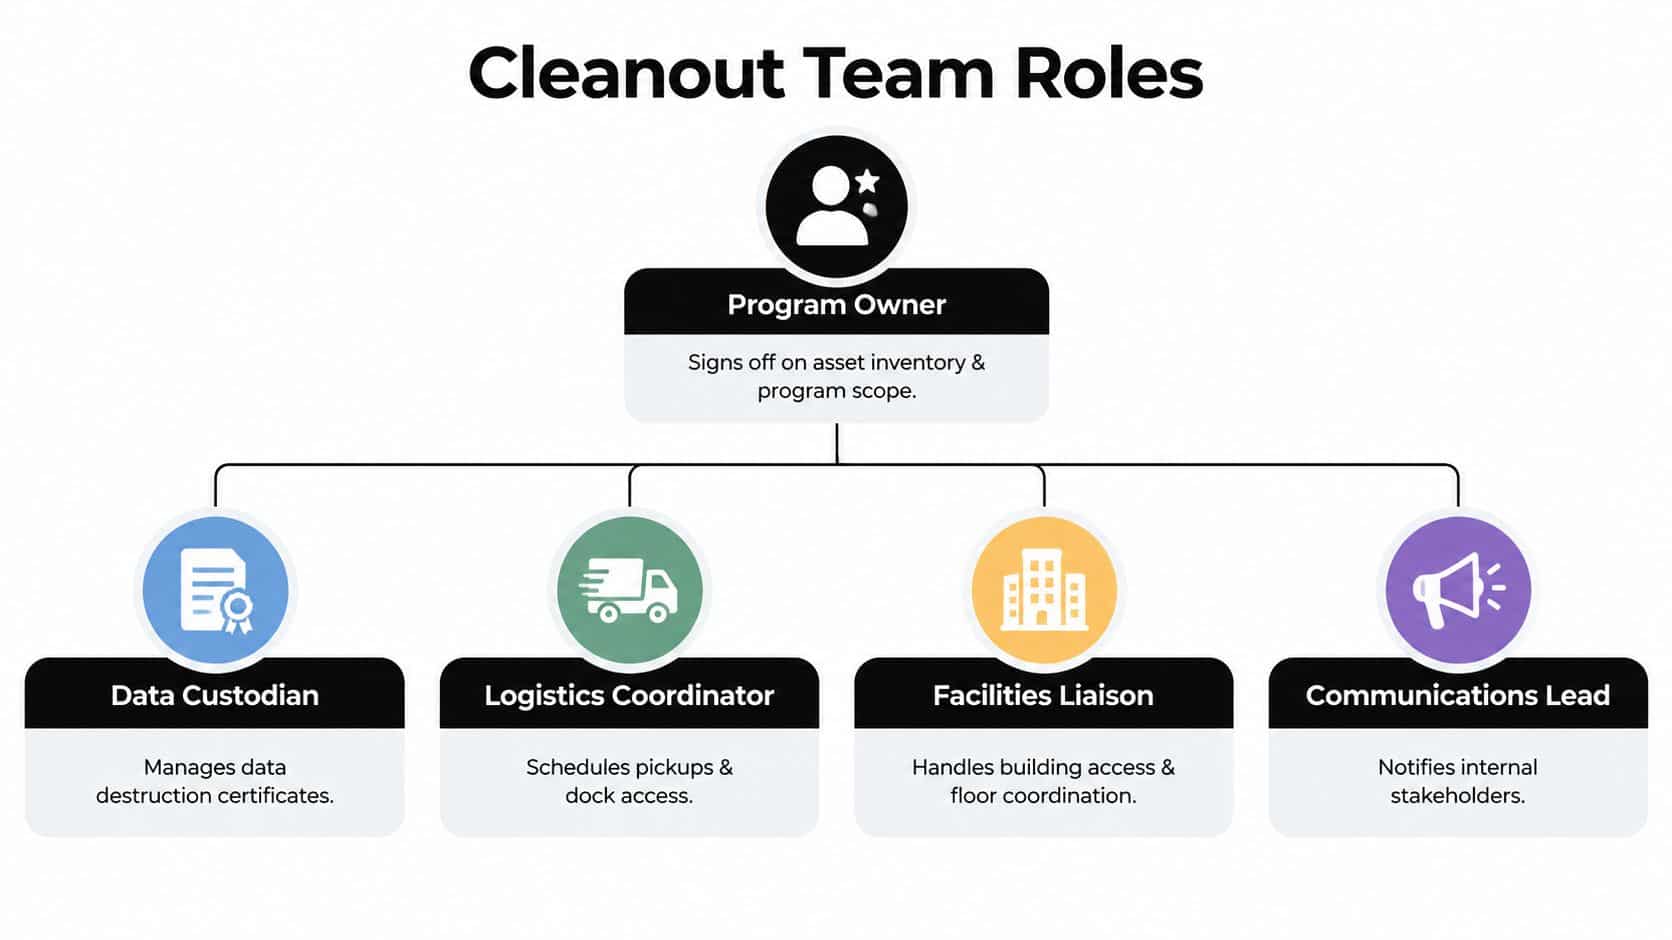
Use a fixed operating calendar
A 30-day schedule keeps the work visible without pretending every project has identical complexity.
- Week 1, inventory and tagging: Export records, conduct the floor walk, classify ownership and data risk, and create the exception queue.
- Week 2, buyback screening and data sweep: Identify reuse candidates, confirm lease obligations, select destruction methods, and approve the vendor scope.
- Week 3, staged removal: Lock the loading plan, complete pickup waves, scan assets, and obtain signed handoff records.
- Week 4, reconciliation: Match certificates to serial numbers, review exceptions, reconcile value recovery, and file the final report.
Three templates support repeatability: an asset spreadsheet with ownership and data-risk fields, a pickup-day checklist covering dock access and parking, and a vendor scorecard covering documentation turnaround, sanitization standards, downstream controls, and pricing transparency. Schedule the next cycle before the current one closes. That forces the team to resolve recurring inventory gaps instead of rediscovering them during the next move.
Checklist and Next Steps With Beyond Surplus
Use this one-page checklist as the approval gate for the project:
Before the cleanout
- Complete the inventory: Reconcile CMDB, procurement, lease, finance, and floor-walk records.
- Classify every asset: Separate data-bearing devices from non-data electronics and ordinary office material.
- Confirm ownership: Identify leased, owned, loaned, warranty-covered, and customer property.
- Assign a route: Mark each item for redeployment, buyback, recycling, or destruction.
- Create exceptions: Give unrecorded or damaged assets temporary identifiers and hold them for review.
During data disposition
- Choose the method per asset: Use Clear, Purge, or Destroy based on confidentiality and media type.
- Approve the location: Select on-site or secured off-site processing according to custody requirements.
- Record the standard: Link each storage device to its sanitization result and certificate.
- Witness when required: Have the Security Lead observe destruction or audit the documented process.
- Protect residual credentials: Treat retired devices as data-bearing until the approved process is complete.
At pickup and close-out
- Stage by wave: Move locked data-bearing assets separately from peripherals and non-data equipment.
- Segregate special materials: Identify batteries, CRTs, toner, refrigerants, and mercury-containing equipment.
- Scan the shipment: Match every serial number to the pickup manifest and Bill of Lading.
- Collect certificates: Require destruction, recycling, receiving, and exception documentation.
- Reconcile value: Apply written buyback credits against the project record and finance ledger.
- File the audit package: Store the final report with the original inventory and approvals.
Resolve the questions generic guides skip
What about equipment under warranty? Check warranty terms and manufacturer return requirements before resale or recycling. Preserve the serial number, condition photos, and transfer record.
How should leased equipment be handled? Keep it separate from owned assets. Follow the lessor's return instructions, obtain a receiving confirmation, and don't destroy leased media without written authorization.
Who signs the certificates? The designated Program Owner should approve the final package, while the IT or Security Lead validates destruction details and exceptions.
How long should records be retained? Set the retention period through your legal, privacy, finance, and records-management policies. The important control is consistency, searchability, and linkage between inventory and disposition records.
How do buyback credits reduce project cost? Finance should reconcile the written quote, accepted equipment, final credit, and applied project charge. Don't treat an estimated resale value as realized recovery.
For a commercial project, the action path is specific. Prepare the asset list and data-bearing count, request a scoped quote, choose on-site or off-site destruction, approve the certificate format, confirm ownership exceptions, and lock pickup windows with the facilities team. A qualified provider should also clarify whether it handles product destruction, data center decommissioning, medical equipment disposal, laboratory equipment disposal, and nationwide logistics under the same documented workflow.
Download the repeatable template set, assign the five roles, and schedule a scoping call before equipment reaches the loading dock. The fastest safe cleanout is the one that makes every asset, decision, handoff, certificate, and recovered credit visible.
Beyond Surplus provides commercial office cleanout, electronics recycling, secure data destruction, IT equipment disposal, IT buyback, product destruction, and data center decommissioning with documented chain-of-custody reporting. Visit Beyond Surplus to request a scoped quote, confirm your asset list and data-bearing count, and schedule a controlled pickup.


